Insert SIM Card
Polaris has got a hinged-type Micro-SIM (3FF) card socket. Follow these steps to insert your SIM card:
1. Unlock slot
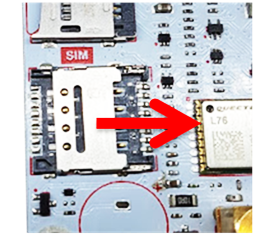
2. Open cover
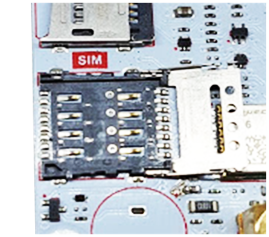
3. Insert SIM
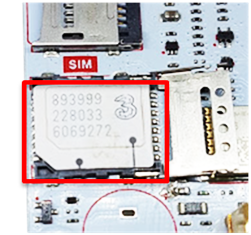
4. Close slot and lock it
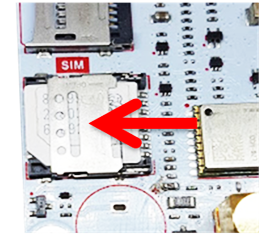
Please note: the SIM security PIN must be disabled before the SIM card can be used on Polaris.
Connect Antennas
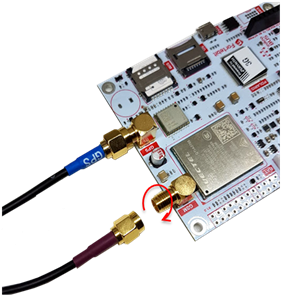
Take the antenna cable ends and plug them into the antenna connector on the Polaris. Turn the antenna cable connector clockwise. Ensure to connect the antennas tightly.
Make sure to plug the GPS/GLONASS antenna into the connector labelled GPS on the board and the GSM antenna into the connector labelled GSM.
Connect main power cable
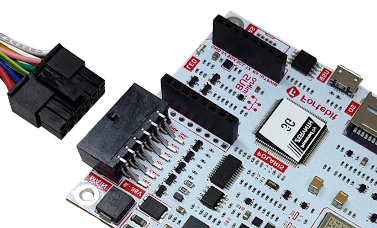
Ensure the latch feature on the connector is faced up as shown in this picture.
Push the cable connector inside the on-board receptacle until it locks firmly in place.
Connect power source and start Polaris
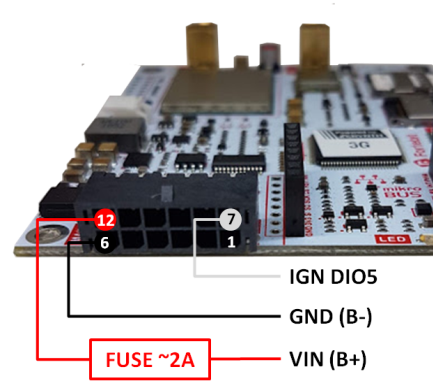
Polaris supports 12V/24V nominal power supplies (the full range is 8 – 32 VDC) and LiPo battery (3.6 – 4.2 VDC). If using 12V/24V power supply, please connect first the battery negative (B–) terminal to pin 6 (black wire), then the positive (B+) terminal to pin 12 (red wire) through a 2A rated fuse, as in the picture.
Then connect vehicle ignition (IGN) to pin 7 (white wire), or connect pin 7 to pin 12 if the ignition output from the vehicle is not available. If using a LiPo battery, connect the battery cable to the BAT connector
In case both 12V/24V power supply and LiPo battery are connected at the same time, Polaris is powered by the 12V/24V supply and the LiPo battery gets charged.
Once Polaris is powered up the red LED turns on.
Setup APN and Email by SMS
Please ensure to insert the correct data, as the wrong information may cause higher costs on your SIM bills or be a source of connection problems
Send an SMS message to the phone number of the inserted SIM card to configure the APN for the data connection of your SIM provider (WAP-only APN is not supported) and the email address you want to use to access the Fortebit Cloud (make sure you can read emails sent to that address).
The text message should have the following format:
apn=APN_NAME, email=EMAIL_ADDRESS
Example:
apn=internet, email=polaris@fortebit.tech
The module will reply with an SMS like the following:
apn APN_NAME saved, email EMAIL_ADDRESS saved
In alternative you can send 2 separate SMS messages, one for the APN and one for the email to configure Polaris:
apn=APN_NAME
email=EMAIL_ADDRESS
The module will reply with the following response:
apn APN_NAME saved
email EMAIL_ADDRESS saved
Optionally you can send another SMS to assign a friendly name (default name is “Polaris”) to your Polaris device, which is displayed on the Cloud platform in addition to the modem IMEI number.
name=POLARIS_NAME
The module will reply with the following response:
name POLARIS_NAME saved
Setup APN and email via USB (alternative)
This is an alternative method to configure Polaris, which is only necessary if you prefer not to use SMS or if that is not allowed by the SIM plan. Use a micro-USB Type B to USB Type A cable and plug the micro USB side to the on-board USB connector. Plug the USB Type A connector to your PC and use a serial terminal emulator to connect to the Polaris device (on a Windows PC, TeraTerm or Putty are recommended). Select the COM port Polaris is connected to and make sure COM port settings are:
Baud rate: 115200
Data Bits: 8
Parity: None
Stop Bit: 1
Flow Control: None
Start Polaris and follow the instructions on the terminal: enter the APN for the data connection of your SIM provider and your email address to access the Fortebit cloud service (a new user account is created as needed).
Cloud registration and account activation
Once Polaris has been configured and connected to the Internet, the LED turns orange and you will receive an email from Fortebit to activate your account. Follow the instructions, activate the account and setup your password. Once you have registered you will receive an email confirmation.
Please note: If you do not receive the activation email, please check your spam folder since your spam filters or email settings may have blocked the activation message.
After your Polaris device has been registered to your account, the LED turns green and Polaris starts sending GPS telemetry data (latitude, longitude and sped) to the Cloud server every 10 seconds. Other telemetry data are sent every minute. The LED briefly turns off while transmitting data to show device activity. If vehicle ignition is off, Polaris sends data every 5 minutes, the green LED turns off and the LED briefly turns yellow while transmitting data.
Cloud login and Polaris dashboard
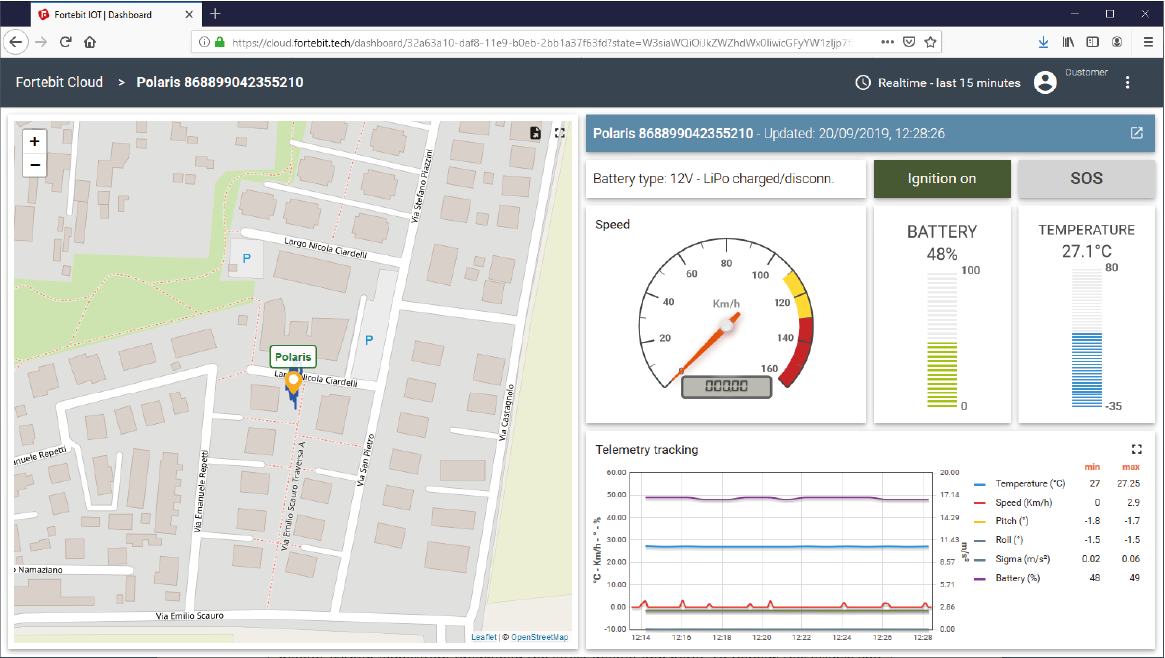
When you log-in to the Fortebit Cloud at the following address https://cloud.fortebit.tech you have access to the Polaris Dashboard.
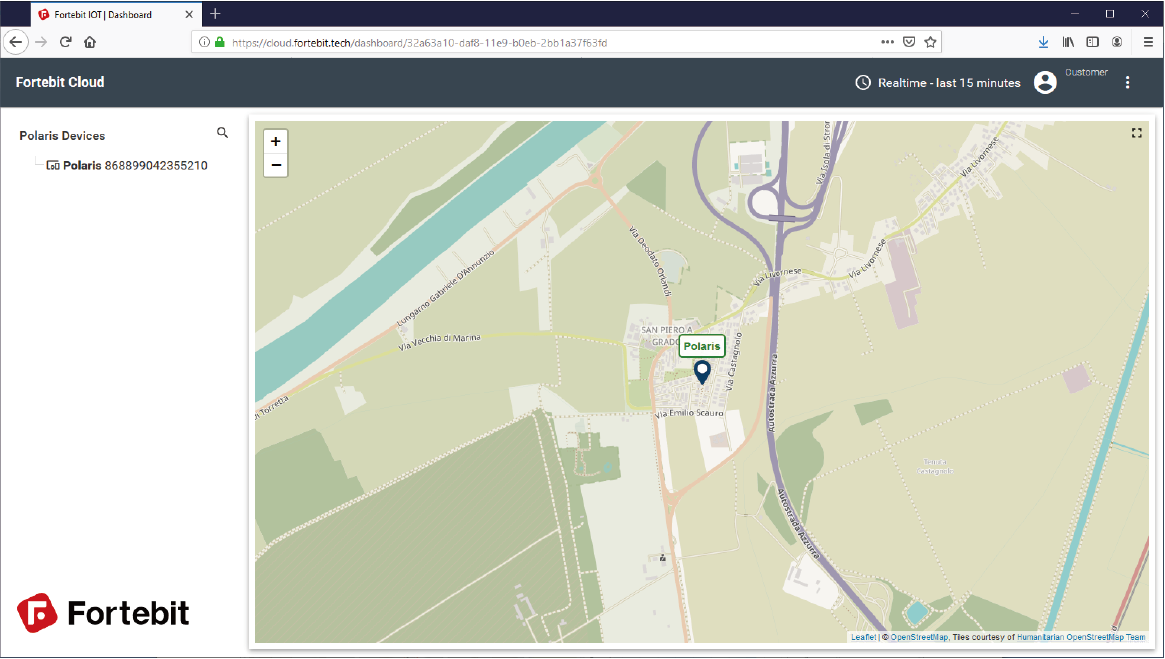
The left panel lists all your registered Polaris devices ordered by name (in this case “Polaris” default name) and IMEI number. If the GPS has received a position fix, your Polaris device is also shown on the map. The device label on the map is green if the last telemetry has been received within 1 minute, orange if within 1 hour and red otherwise.
The Telemetry Dashboard shows:
– GPS trace of the last 15 minutes in blue and the current position on the map.
– Battery type, ignition status (green on), SOS or emergency button status (red on), last received speed, temperature and battery level on dedicated widgets.
– Telemetry data of the last 15 minutes on a chart widget.
- Click the 3 dots icon on the top right corner to configure your profile (name and last name), set the language or change the password.
- Click the device name on the list or the icon on the map to open the Telemetry Dashboard that shows telemetry data in real time.
The top right panel shows the time of the last telemetry update received. Click the icon on the right of this panel to open a new dashboard with raw telemetry data.
- Click the Polaris icon on the map to open a popup with additional information.
- Click the clock icon on the right of the toolbar to select the period of your interest.
- Click the export data icon on the right of the map widget to export selected data in CSV or Excel format
Customizing Polaris
You can program Polaris with either Zerynth Studio (Python/C language) or Arduino (C++) development environments. Please refer to the following user guide for programming Polaris.
Please note: The device comes pre-programmed in factory with a Zerynth VM license and a default Python application (download the latest default app at: https://github.com/fortebit). To redeem this license you need to connect the Polaris board to Zerynth Studio and do a successful upload at least once. If you program Polaris with Arduino software the Zerynth license information is overwritten and can only be recovered if you had done the above step.
